OpenCRMApp — User Guide

Step-by-step guides for using OpenCRMApp on Android and iOS. Last updated · October 2026

✅
What you need to get started Your vtiger CRM server URL, your vtiger username, and your vtiger password. Or try the demo first — no CRM required.

Login & Setup

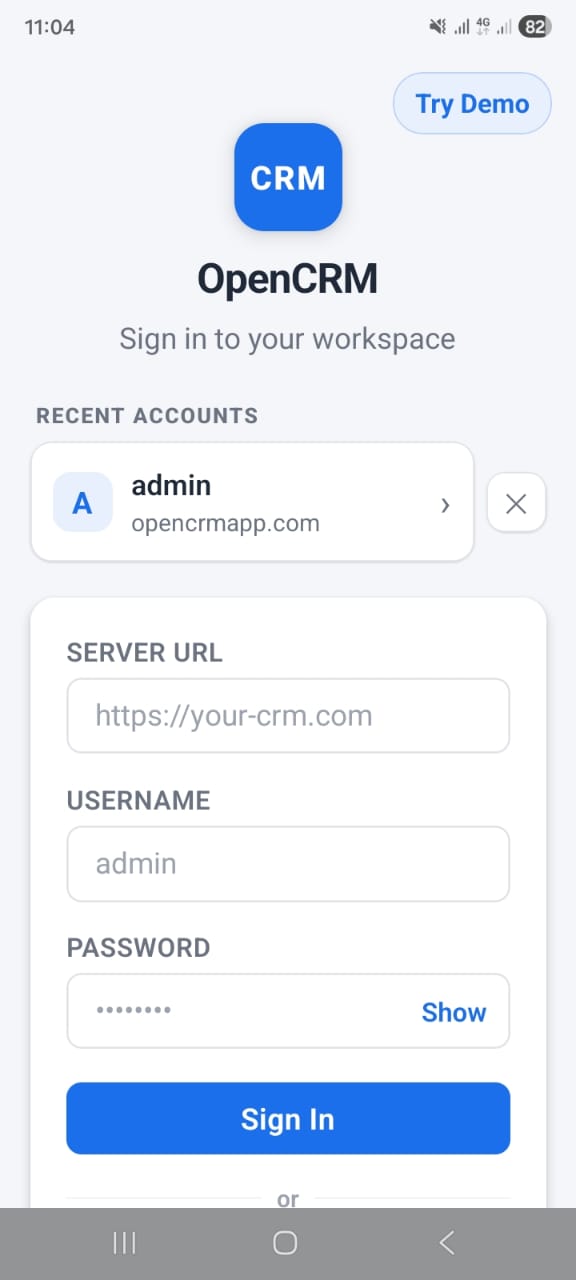
The first screen you see when you open OpenCRMApp is the Login screen. This is where you connect the app to your vtiger CRM server.

Logging in to your vtiger CRM

1
Enter your vtiger CRM server URL in the first field.
Example: https://crm.yourcompany.com
2
Enter your vtiger username — the same one you use to log in to vtiger in your browser.
3
Enter your password — the same password you use to log in to vtiger.
4
Tap Login. The app will connect to your server and load your CRM data.
⚠️
Server URL must be reachable from your phone If your vtiger CRM is only accessible inside your company network, you will need to be connected to that network (or VPN) for the app to connect.

Login history

1
Tap a saved instance in the history list to pre-fill the URL and username fields automatically.
2
Enter your password and tap Login to reconnect in seconds.
3
To remove a saved instance from the list, swipe left on it and tap Delete.
💡
Multiple servers You can save and switch between multiple vtiger CRM instances. This is useful if you manage several client installations or have a staging and production environment.

Try the demo

Not ready to connect your own vtiger CRM? You can explore OpenCRMApp using the built-in Demo mode before connecting to a real server.
1
On the Login screen, tap "Try Demo" (shown below the Login button).
2
The app opens with sample CRM data — contacts, leads, deals, tickets, notifications, and calendar events — so you can explore every feature.
3
When you are ready, go back to the Login screen and connect your own vtiger CRM server.
✅
What you can do in demo mode Browse records, open the notification inbox, explore workflow rules, and see all app features — using realistic sample data. Demo data resets periodically and cannot be saved to a real CRM.
OpenCRMApp — Login screen with server URL, username, access key fields and Try Demo button

Login troubleshooting

→ "Connection failed" or "Cannot reach server"
  • Make sure the URL starts with https:// or http://.
  • Check that you can reach the URL from your phone browser — open it and see if vtiger loads.
  • If the server is on a private network, connect to the company VPN first.
  • Check that your vtiger CRM server is running and accessible from outside the office.
→ "Invalid credentials" or "Authentication failed"
  • Check that your username is correct — it is the same one you use to log in to vtiger in your browser.
  • Make sure you are entering your vtiger password, not a different password.
  • If you recently changed your vtiger password, use the new one.
  • If your account is locked or deactivated in vtiger, contact your CRM administrator.
→ I don't have a vtiger CRM server yet

You can use Demo mode to explore OpenCRMApp without a server. Tap Try Demo on the Login screen.

To get OpenCRMApp working with your company's vtiger CRM, contact us — we can help with compatibility and setup.

Homepage

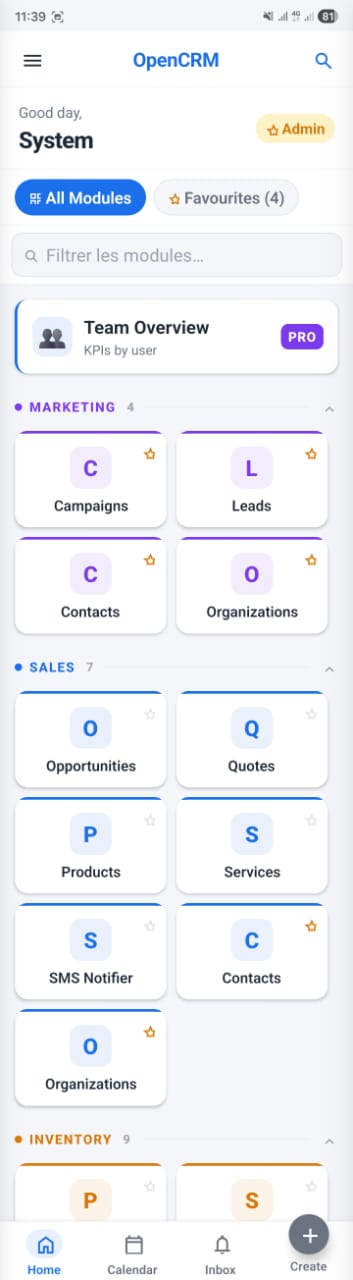
After logging in, the Home screen is the first thing you see. It gives you a quick overview of your starred records and lets you navigate to any CRM module.

What you see on the home screen

👋
Greeting & role
Shows your name and your vtiger role (e.g. Admin, Sales Rep). Pulled directly from your CRM account.
⭐
Starred records
Records you have starred appear here for one-tap access. Tap any starred card to open that CRM record directly.
📦
All Modules / Favourites
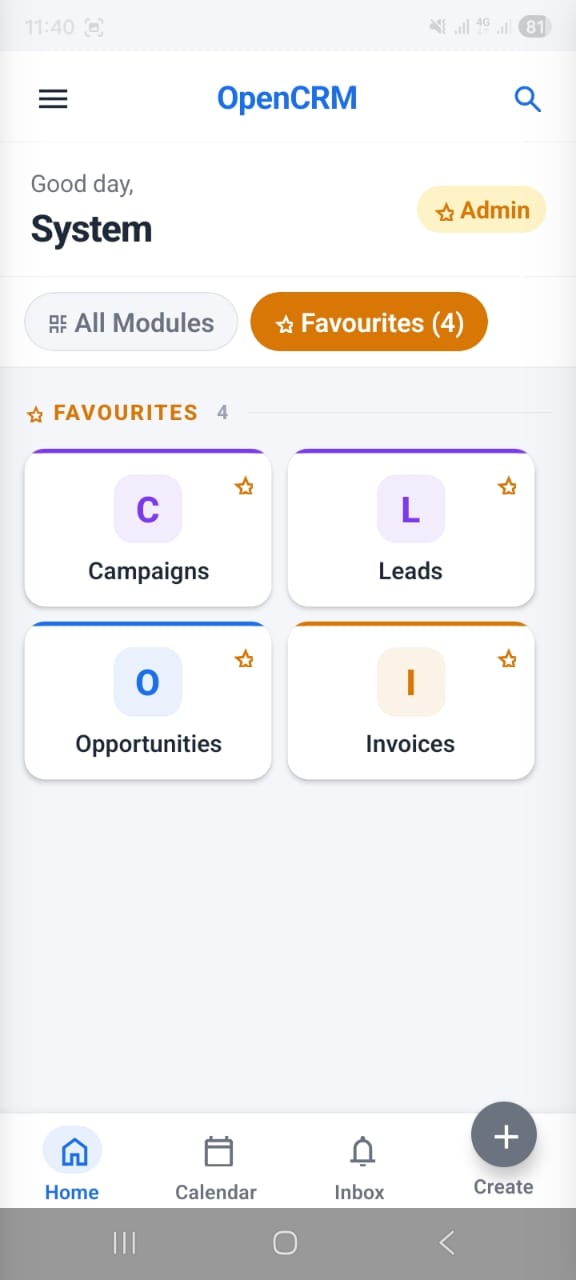
Toggle between seeing all CRM modules grouped by category, or only the modules you have marked as favourites.
🔎
Filter modules field
Type a module name to quickly find it in the list without scrolling through all categories.

Bottom navigation bar

The bar at the bottom of the screen is always visible and gives you quick access to the four main areas:

🏠 Home — Return to this screen
📅 Calendar — Your CRM calendar & activities
🔔 Inbox — Your notification inbox
+ Create — Create a new CRM record

Marking a module as a Favourite

1
On the Home screen, make sure All Modules is selected (blue tab).
2
Find the module you want to favourite. Each module card has a ☆ star icon in its top-right corner.
3
Tap the star. It turns solid ★ — the module now appears when you switch to the Favourites tab.
💡
Tip Use the Favourites tab to keep only the 3–5 modules your team uses every day front and centre. This makes the home screen much faster to navigate.
All Modules
OpenCRMApp — Home screen All Modules tab showing Marketing, Sales, Inventory categories
Favourites tab
OpenCRMApp — Home screen Favourites tab showing 4 starred modules

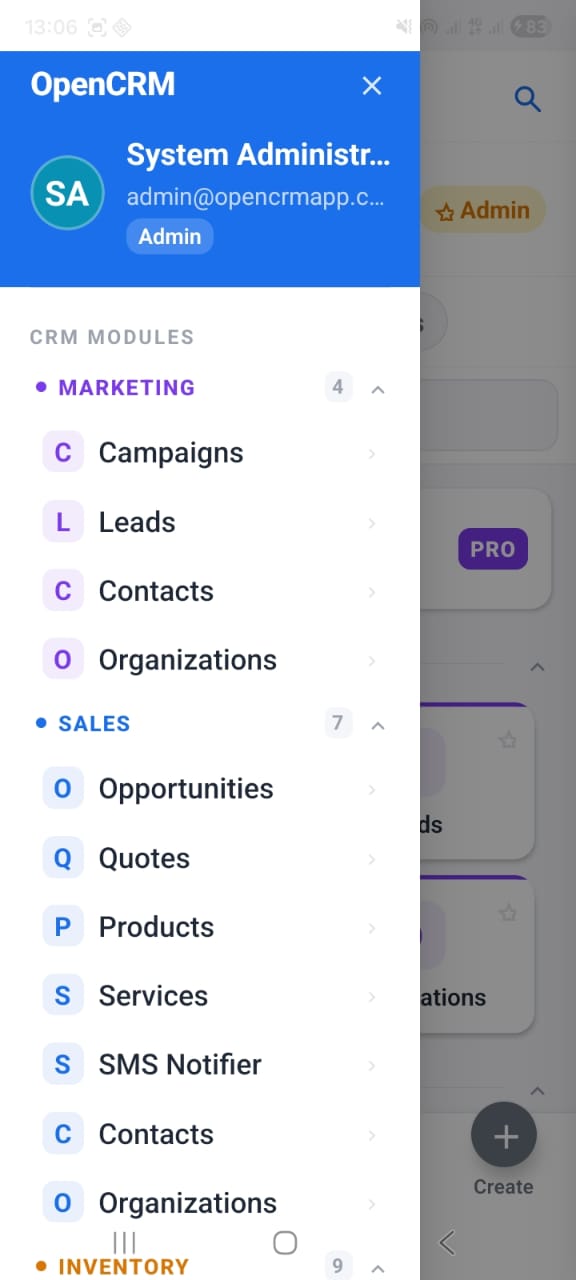
The side drawer menu gives you access to every CRM module organised by category. It also shows your account information at a glance.

Opening the menu

1
Tap the ≡ hamburger icon in the top-left corner of the Home screen.
2
The drawer slides in from the left, showing your profile at the top and all CRM modules below.

What the menu contains

👤
Profile header
Shows your avatar, full name, email address, and your vtiger role (Admin, User, etc.).
📂
CRM Modules by category
All modules are grouped by category — Marketing, Sales, Inventory, and more. Each category shows how many modules it contains.
▲
Collapse / expand categories
Tap the category name or arrow to collapse a group you don't use, keeping the menu shorter.

Module categories in the menu

● MARKETING Campaigns · Leads · Contacts · Organizations
● SALES Opportunities · Quotes · Products · Services · and more
● INVENTORY Orders · Invoices · Price Books · and more
● SUPPORT HelpDesk tickets · FAQ · and more

Closing the menu

Tap × in the top-right of the drawer, or tap anywhere outside the menu panel on the right side of the screen.
💡
Direct navigation Tap any module name in the drawer to jump directly to that module's record list. You do not need to go through the Home screen first.
OpenCRMApp — Side drawer menu showing user profile and CRM modules grouped by category

Global Search lets you find any CRM record across all modules from a single screen — without opening a module first.

Opening search

1
Tap the 🔍 search icon in the top-right corner of the Home screen.
2
The Search screen opens. It immediately shows the 100 most recently modified records for the selected module.

Searching across modules

1
At the top of the screen you see the active module (e.g. "Contacts"). Tap it to see a list of all available modules and pick the one you want to search in.
2
Type your search in the search field. Results update as you type — no need to press Enter.
3
Tap any result in the list to open that CRM record.

Recently modified list

When you open search without typing anything, the app shows the most recently modified records in the selected module. This makes it fast to reopen a record you were just working on.

💡
Switch module before searching By default the search is scoped to the last module you used. Always check the module chip at the top — tap it first if you need to search in Leads, Opportunities, Tickets, or another module.
⚠️
Search works on your server Each search sends a live query to your vtiger CRM server. A stable internet connection (or VPN) is required for results to appear.

Closing search

Tap the × close button in the top-right corner, or press Back on Android, to return to the previous screen.
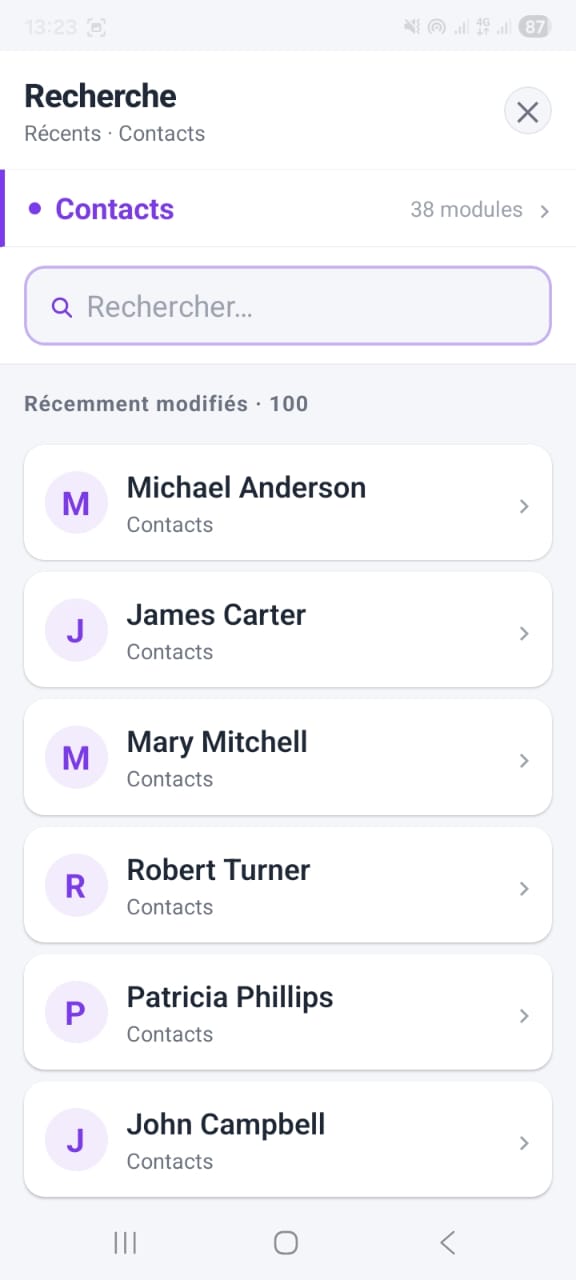
OpenCRMApp — Global search screen showing module filter and recently modified records

List View

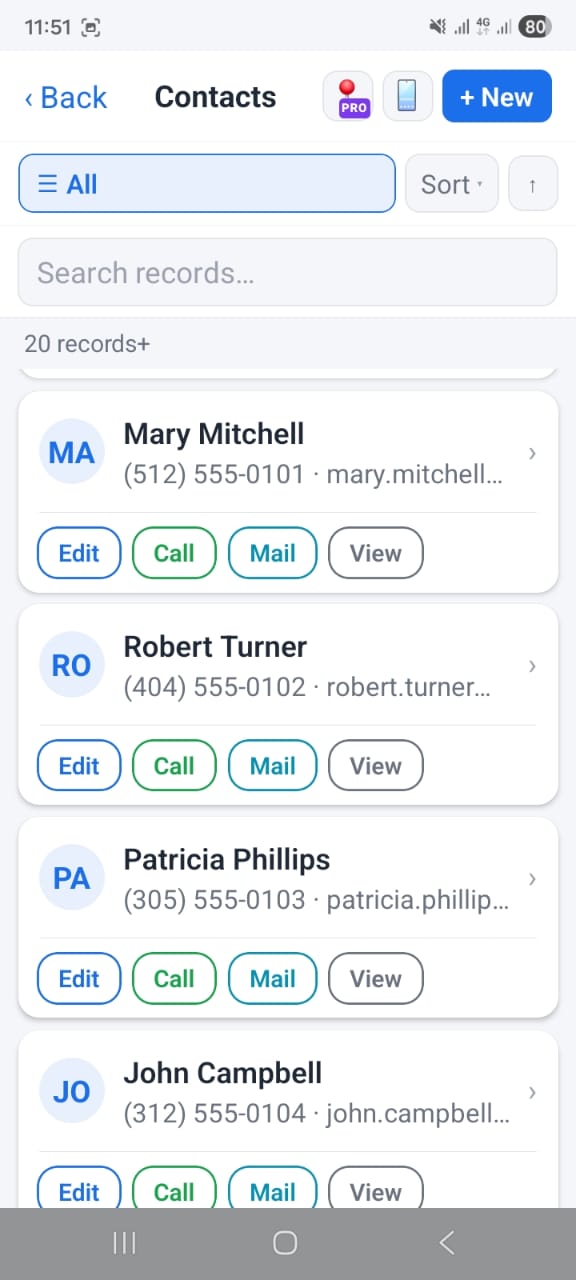
The List view shows all records in a module as a scrollable list. Each card displays the most important fields and lets you take quick actions without opening the full record.

Reading a record card

👤
Record name & key fields
The record's primary name is shown in bold at the top. Underneath you see the most useful fields for that module (e.g. phone, email, company for Contacts).
⚡
Quick action buttons
Each card has up to four buttons on the right: Edit, Call, Mail, and View. Tap one to act immediately without opening the record.
📋
Record count
The header shows how many records are loaded (e.g. "20 records+"). Scroll to the bottom to load more.

Switching the view

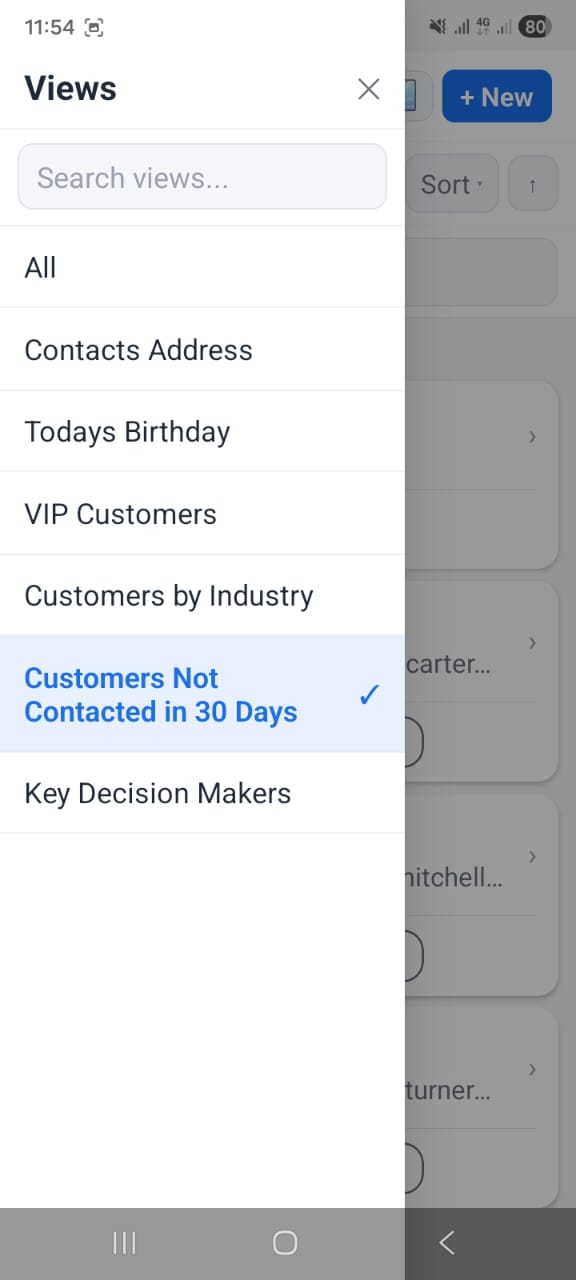
The ≡ view selector at the top of the list lets you switch between saved vtiger views — for example "All Contacts", "VIP Customers", or "Not Contacted in 30 Days".

1
Tap the ≡ view icon next to the module title to open the Views panel.
2
Tap the view you want — e.g. Customers Not Contacted in 30 Days or Todays Birthday. The list reloads using that view's filters.
3
To go back to all records, select All from the views panel.
💡
Views come from your vtiger CRM The views shown are the same saved views defined in your vtiger CRM installation. You can create new views inside vtiger and they will appear here automatically.

Sorting the list

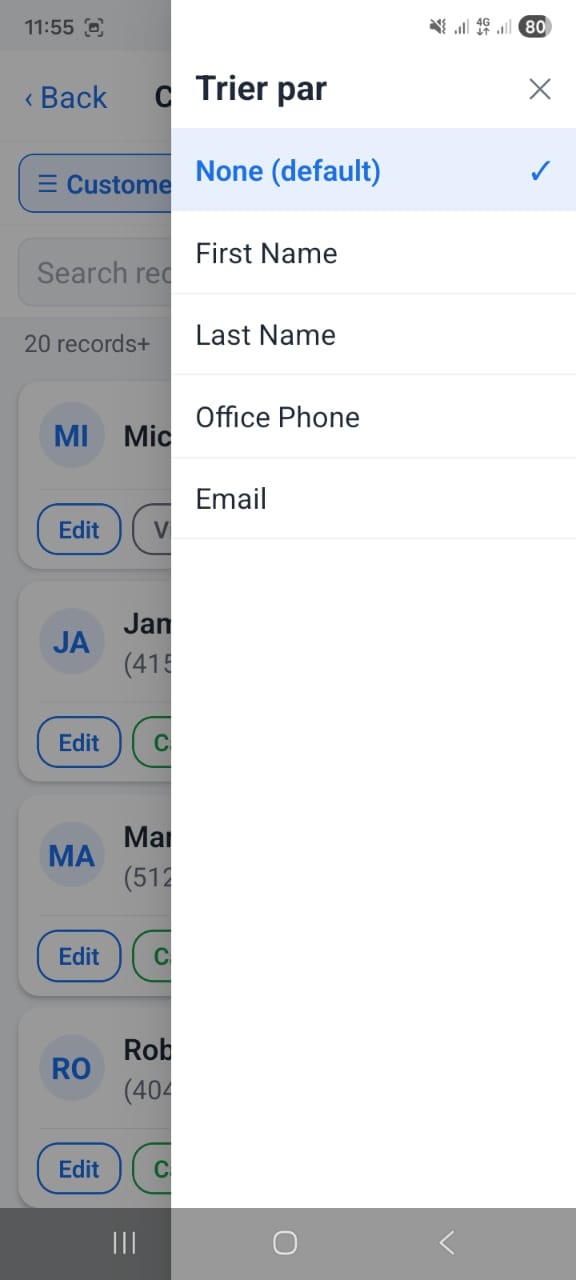
Tap the Sort button (next to the search field) to open the sort panel. Choose the field to sort by:
None (default) First Name Last Name Office Phone Email
💡
Inline search Use the search field at the top of the list to quickly filter the records already loaded on screen. For a full cross-module search, use Global Search instead.
Records list
OpenCRMApp — Contacts list showing Edit, Call, Mail, View quick action buttons per card
Views panel
OpenCRMApp — Views panel listing All, VIP Customers, Not Contacted in 30 Days and other vtiger saved views
Sort panel
OpenCRMApp — Sort panel with options: None, First Name, Last Name, Office Phone, Email

Import Contacts from Your Phone

OpenCRMApp can import contacts stored on your phone directly into your vtiger CRM as new Contact records — saving you the time of entering each one manually.

How to import phone contacts

1
Open the Contacts module from the Home screen or the side menu.
2
Tap the Import button (phone icon) in the top-right area of the Contacts list.
3
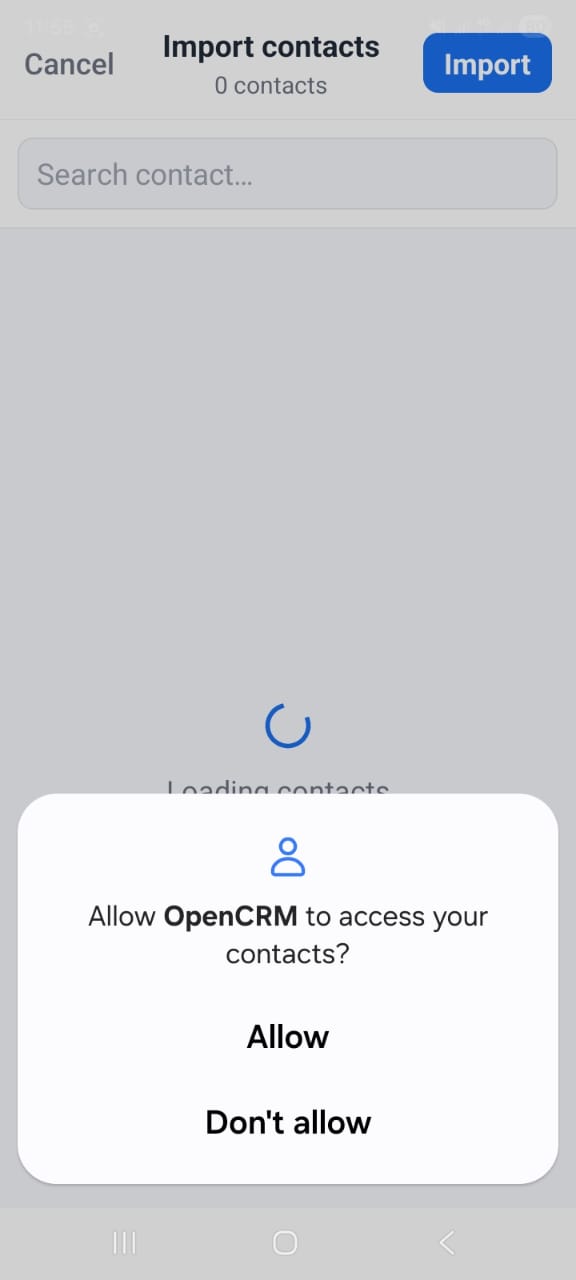
Your phone will ask: "Allow OpenCRM to access your contacts?" Tap Allow to grant permission. Without it the import cannot read your phone's address book.
4
The import screen shows your phone contacts. Select the ones you want to create in vtiger.
5
Tap Import. The selected contacts are created as new Contact records in your vtiger CRM.
⚠️
Permission required on first use The app needs contacts permission to read your address book. You only need to grant this once. If you previously tapped "Don't Allow", go to your phone's Settings → Apps → OpenCRMApp → Permissions → Contacts and enable it.
💡
Review before importing Contacts are created immediately in your vtiger CRM once you confirm. Review your selection carefully — you can delete unwanted records from within vtiger afterwards.

What gets imported

OpenCRMApp maps the standard contact fields from your phone's address book to the corresponding vtiger Contact fields:
First & last name
Phone number(s)
Email address(es)
Company name
OpenCRMApp — Import contacts screen showing the system permission dialog asking to allow contacts access

Record Detail

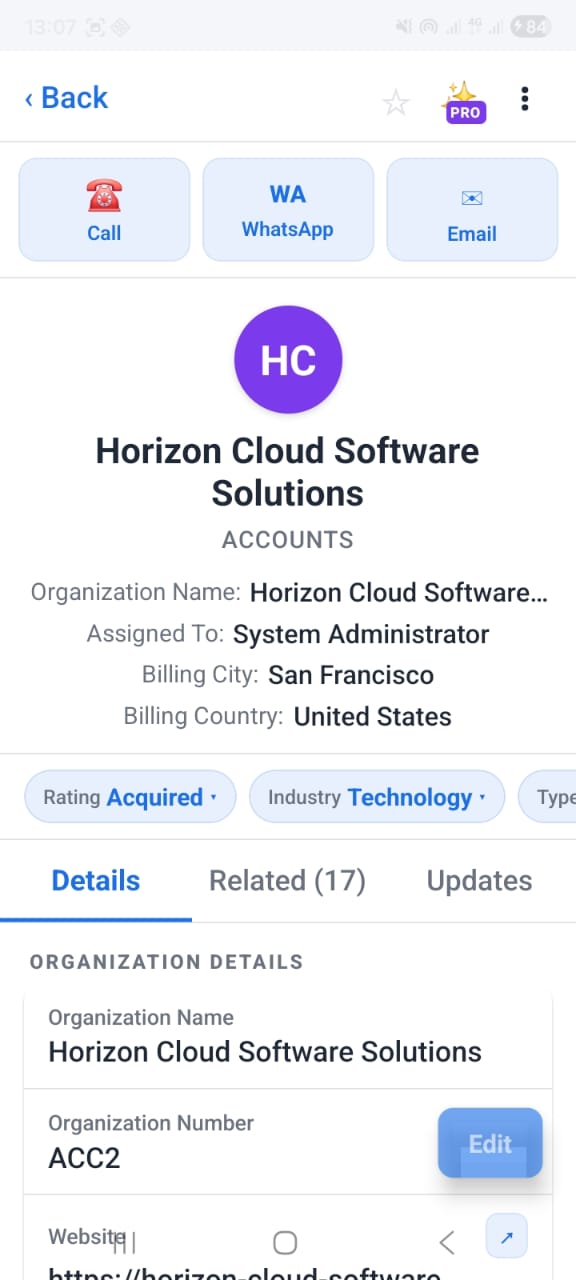
The Record Detail screen shows all fields, related records, and activity history for a single CRM record — and lets you call, message, or email the contact directly from the same screen.

Opening a record

1
From any module list, tap a record row to open its detail screen.
2
The screen loads with the record name, module label, and a summary of its key fields at the top.
3
Tap Back in the top-left corner to return to the list.

Quick action buttons

Below the header, three one-tap action buttons let you reach the record's contact instantly:

📞
Call
Opens your phone's dialler pre-filled with the CRM phone number.
💬
WhatsApp
Opens a WhatsApp chat with the record's phone number directly.
✉️
Email
Opens your email client pre-addressed to the record's email address.

Inline filter pills

Below the summary fields, scrollable pill chips show key picklist values — such as Rating, Industry, and Type — so you can read the record's status at a glance without scrolling into the full details.

Detail tabs

Details tab
All CRM fields for this record, grouped by block (e.g. Organization Details, Address). Tap Edit in the bottom-right to modify any field.
Related tab
All related records linked to this entry — for example, the contacts, opportunities, and tickets associated with an Account. The count in brackets (e.g. Related (17)) shows the total number of linked records.
Updates tab
The full activity log for this record — comments, field changes, and system events in chronological order.

Editing a record

1
On the Details tab, tap the Edit button (bottom-right corner of the screen).
2
All fields become editable. Update the values you need.
3
Tap Save to write the changes back to your vtiger CRM server.

Starring a record

1
Tap the ☆ star icon in the top-right header of the detail screen.
2
The star turns solid ★ and the record now appears in your Starred records section on the Home screen for instant access.
💡
Three-dot menu Tap the ⋮ icon in the top-right corner for additional actions: Delete record, Share, Duplicate, or open in browser.
OpenCRMApp — Record detail screen for Horizon Cloud Software Solutions showing Call, WhatsApp, Email actions and Details / Related / Updates tabs

Quick Create

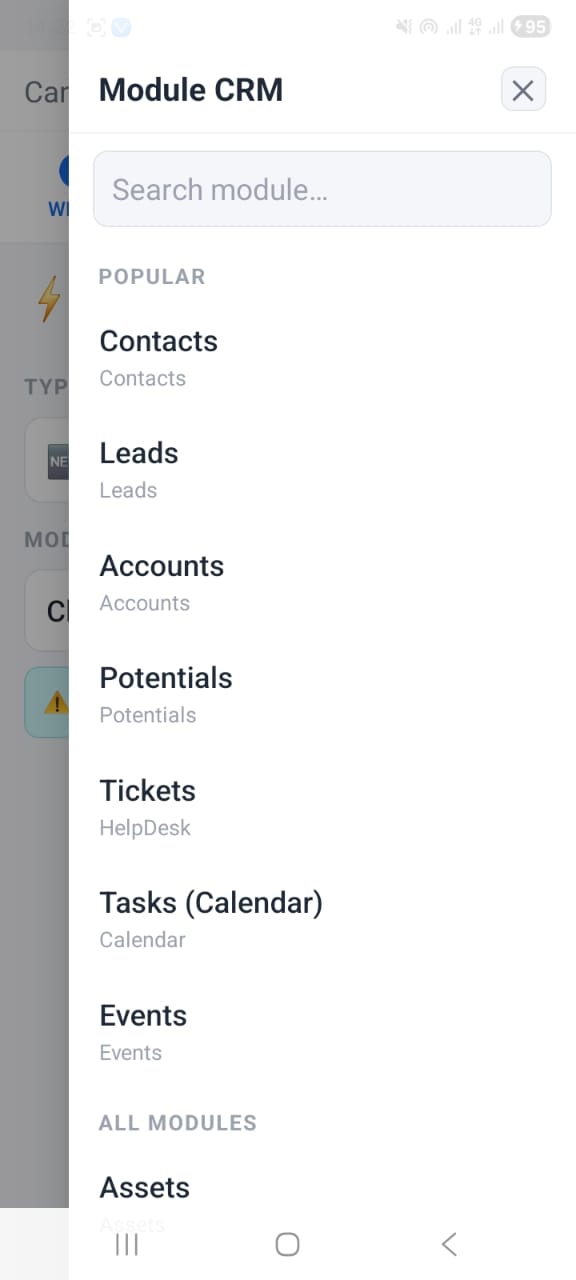
Quick Create lets you create a new CRM record in any module without leaving what you are doing — accessible from the bottom navigation bar at any time.

Opening Quick Create

1
Tap the + Create button in the bottom navigation bar. It is always visible, on every screen.
2
A Module picker sheet slides up. It shows your most-used modules under Popular and every available module under All Modules.
3
Tap the module you want to create a record in — for example Contacts, Leads, or Tickets.
4
The create form opens with all required fields. Fill in the details and tap Save.

Popular modules

The Popular section shows the modules most frequently used for quick creation. These are shown first so you can reach them without scrolling:

👤 Contacts
🎯 Leads
🏢 Accounts
💼 Potentials
🎫 Tickets
📅 Tasks (Calendar)
🗓️ Events

Searching for a module

1
Type in the "Search module…" field at the top of the picker sheet.
2
The list filters in real time. Tap the module once it appears.
💡
All Modules section Scroll past Popular to see the complete list of all CRM modules available on your server — including custom modules your administrator has created.
✅
Create from anywhere You can open Quick Create while browsing a record detail, reading the notification inbox, or viewing the calendar — you never need to navigate away first.
OpenCRMApp — Quick Create module picker showing Popular modules: Contacts, Leads, Accounts, Potentials, Tickets, Tasks, Events

Kanban View

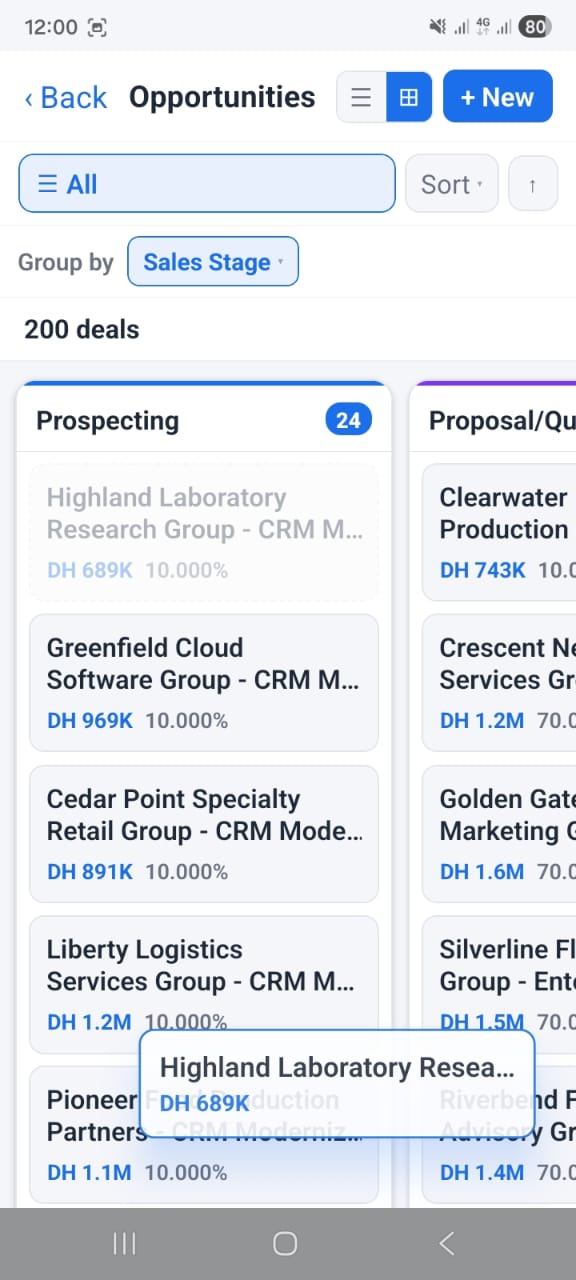
The Kanban view displays your CRM records as cards organised in columns by stage or status — giving your team an instant visual overview of where each deal or ticket stands.

Opening Kanban

1
Open a module that supports Kanban — for example Opportunities or HelpDesk.
2
In the list view header, tap the Kanban icon (grid/columns icon) to switch from the list to the board layout.
3
Scroll horizontally to see all pipeline stages. Scroll vertically within a column to see all cards in that stage.

Reading a Kanban card

🏷️
Stage column
Each column represents a pipeline stage (e.g. Prospecting, Proposal, Won). The column header shows the stage name and total number of records in it.
💰
Deal amount & key info
Each card shows the record name, the associated amount, the responsible user, and the expected close date.
👆
Tap to open
Tap any card to open the full record detail view where you can edit fields, view related records, or take actions.
💡
Best used for Opportunities Kanban is especially useful for tracking your sales pipeline — you can see at a glance how many deals are in each stage and which ones need attention.
OpenCRMApp — Kanban board showing Opportunities grouped by sales stage with deal amounts

Calendar

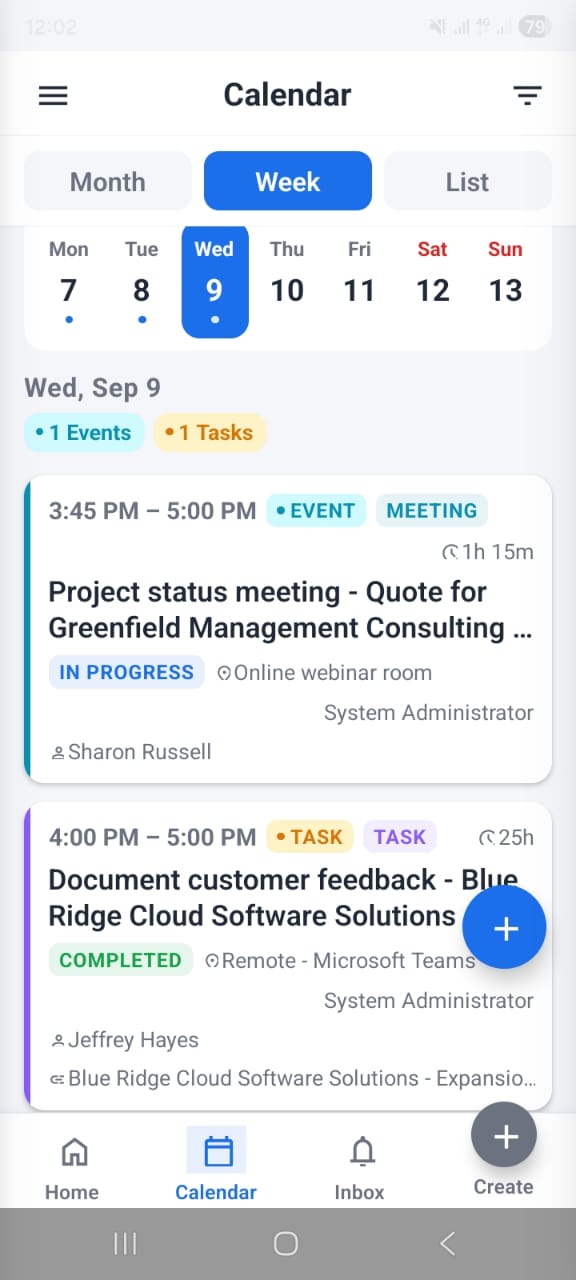
The Calendar shows all your vtiger activities — calls, meetings, tasks, and events — in a familiar mobile calendar interface. Switch between month, week, and agenda views depending on how you prefer to plan your day.

Opening the Calendar

Tap the 📅 Calendar icon in the bottom navigation bar from any screen. The calendar opens on the current date.

Month view

1
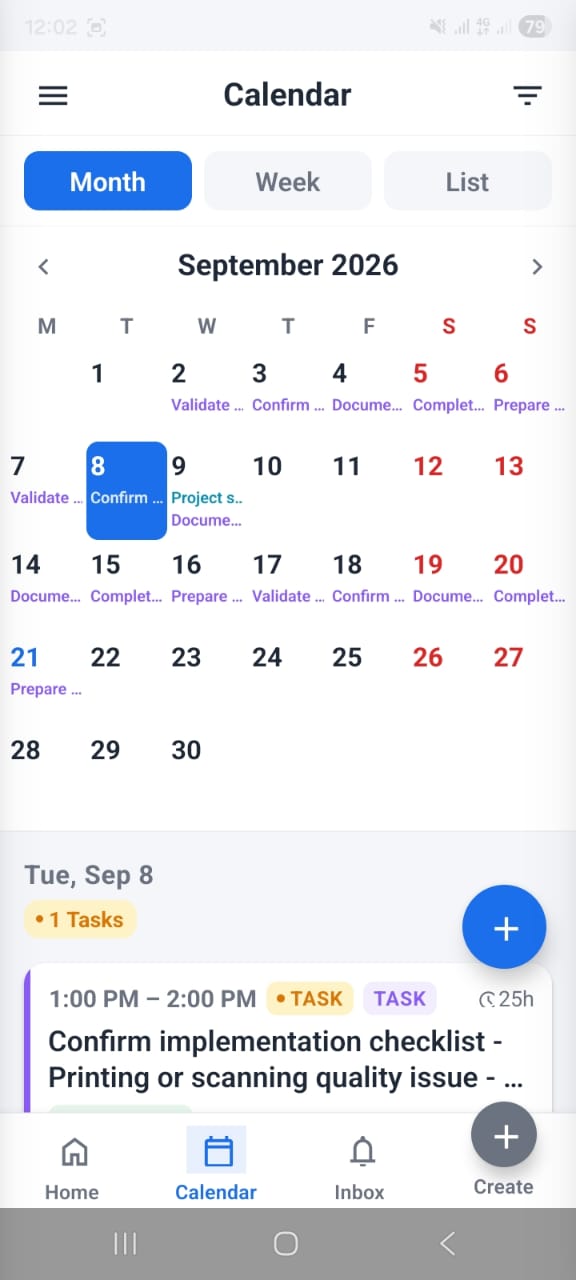
The month grid shows the current month with coloured dots on days that have activities scheduled.
2
Tap any day to see a summary of that day's activities listed below the grid.
3
Swipe left or right to navigate between months. Tap Today to jump back to the current date.

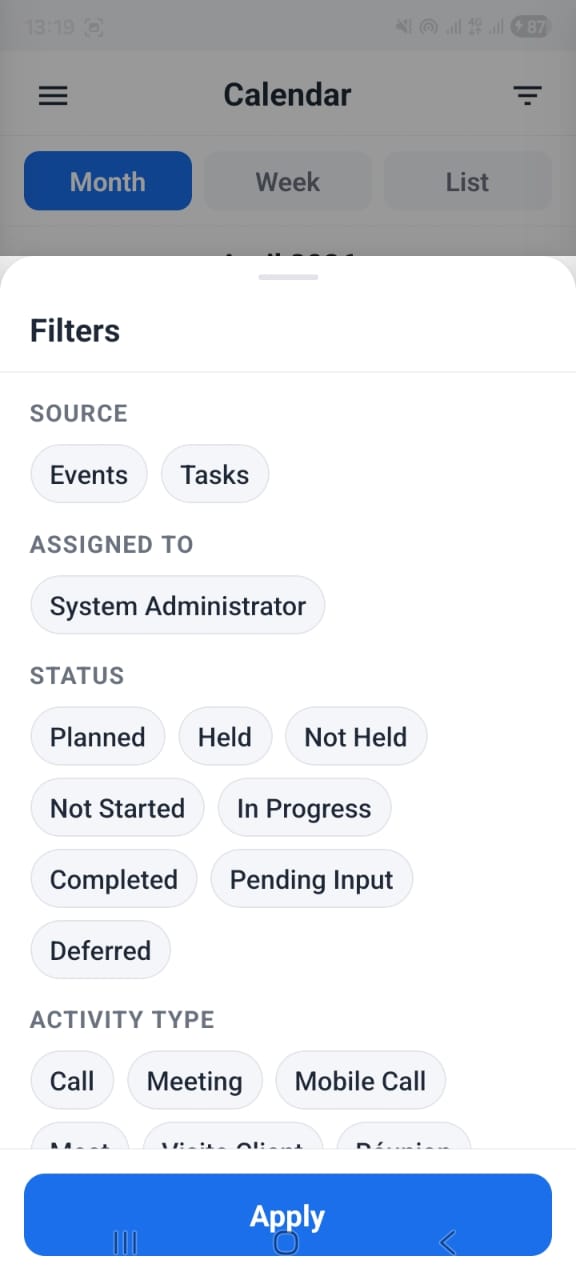
Filtering events

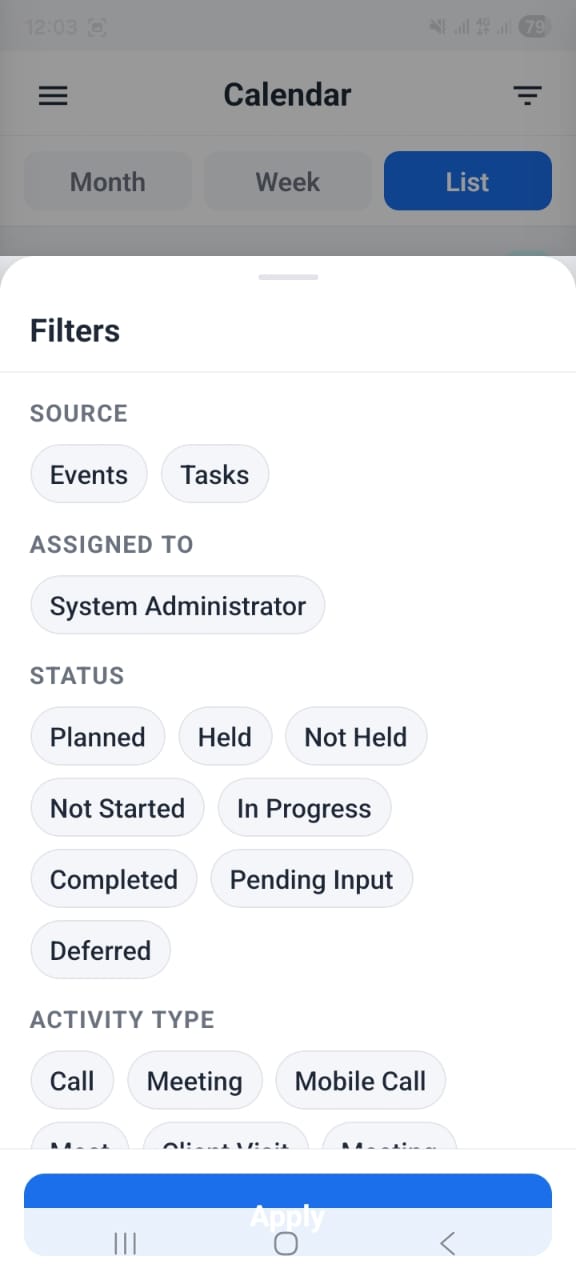
Use the filter button in the calendar header to show only specific activity types — for example show only Calls, or only Meetings. This helps keep the calendar readable when you have many activities.
💡
Tap an activity to open its CRM record Tapping any event in the calendar opens the linked vtiger record directly — so you can review notes, contact details, or related records before a call or meeting.
Month view
OpenCRMApp — Calendar month view with activity dots on scheduled days
Event filter
OpenCRMApp — Calendar event filter panel to show only specific activity types

Week view

Switch to Week view to see a time-based layout of the current week. Each day is shown as a vertical column with hourly time slots, making it easy to spot overlapping events or gaps in your schedule.

1
Tap the Week tab at the top of the calendar to switch views.
2
Scroll vertically to see earlier or later times. Swipe horizontally to move between weeks.
3
Tap any event block to open the linked CRM record.

Agenda / Timeline view

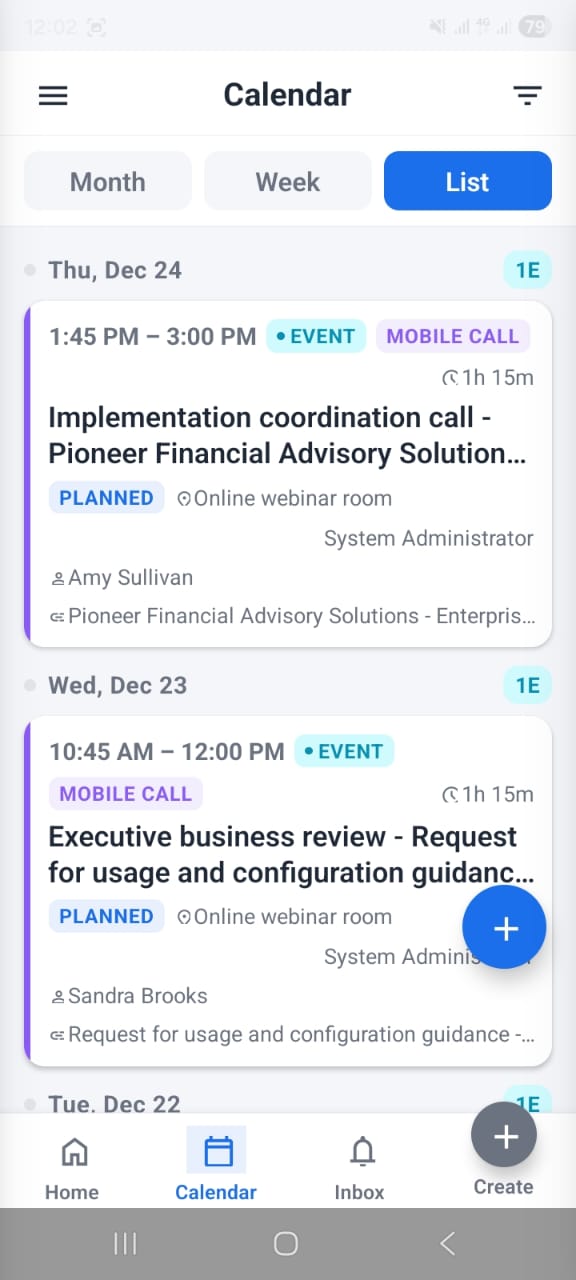
The Agenda view shows your upcoming activities as a scrollable timeline — listed in chronological order with the date, time, and event title. This is the fastest way to see what's coming up next without navigating a grid.
💡
Best view for a busy day Use the Agenda view in the morning to quickly review everything scheduled for today and this week — then tap any item to open the related CRM record and prepare.
💡
Creating a new activity Tap the + button while in the calendar to create a new Call, Meeting, or Task directly from the app. The new activity is saved to your vtiger CRM immediately.
Week view
OpenCRMApp — Calendar week view showing time-slot grid with scheduled events
Agenda view
OpenCRMApp — Agenda timeline showing upcoming activities listed chronologically

Maps & Directions

OpenCRMApp includes address autocomplete on every address field — so when you create or edit a record you can find and fill in any address in seconds, without typing every line manually.

Address autocomplete

Any address field in the app (Billing Address, Shipping Address, Contact address, etc.) opens a smart address picker when you tap it.

1
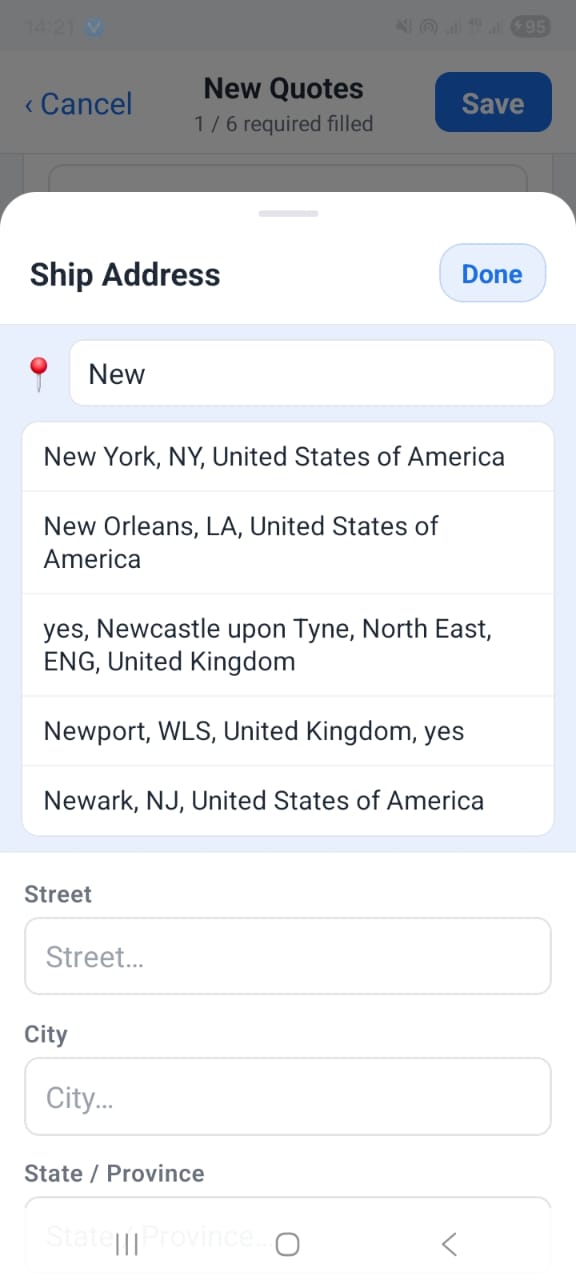
Tap an address field — for example Ship Address in a Quote form. A bottom sheet slides up with a search field and individual address lines below it.
2
Start typing the city, street, or postcode. The app queries a live geocoding service and shows matching suggestions as you type.
3
Tap a suggestion from the list. The Street, City, State / Province, and Country fields are filled in automatically.
4
Review the pre-filled fields and adjust any detail if needed, then tap Done to confirm the address.
💡
Works for all address types Autocomplete is available on every address block in the app — Billing Address, Shipping Address, and any custom address field your vtiger admin has added to a module.

Viewing a record on the map

1
Open a record that has an address — a Contact, Account, Lead, or any module with an address field.
2
Tap the map icon next to the address field on the detail screen. The record's location opens in the in-app map view.
3
Tap Get directions to open the address in your phone's default navigation app (Google Maps, Apple Maps, Waze, etc.).

Nearby records

The map view also supports a Nearby mode — tap the location button to see all records of the current module that are within a set radius of your current GPS position. Useful for field sales teams visiting customers.
✅
Requires location permission Nearby mode needs GPS access. On first use your phone will ask "Allow OpenCRMApp to access your location?" — tap Allow while using the app. You can change this later in your phone's Settings → Apps → Permissions.
OpenCRMApp — Ship Address autocomplete picker showing search field with suggestions for New York, New Orleans, Newcastle, Newport and Newark

Products & Inventory

When creating or editing a Quote, Invoice, Sales Order, or Purchase Order, OpenCRMApp lets you add products and services as line items — with quantities, unit prices, discounts, and running totals calculated automatically.

Opening the inventory section

1
Open or create a Quote (or Invoice / Sales Order). Scroll down the form to the ARTICLES section.
2
Tap Add a Product to search and select a product from your vtiger catalogue, or tap Add a Service to add a service line.

Adding a product line item

1
Tap Add a Product. A product search opens — type to find the product by name.
2
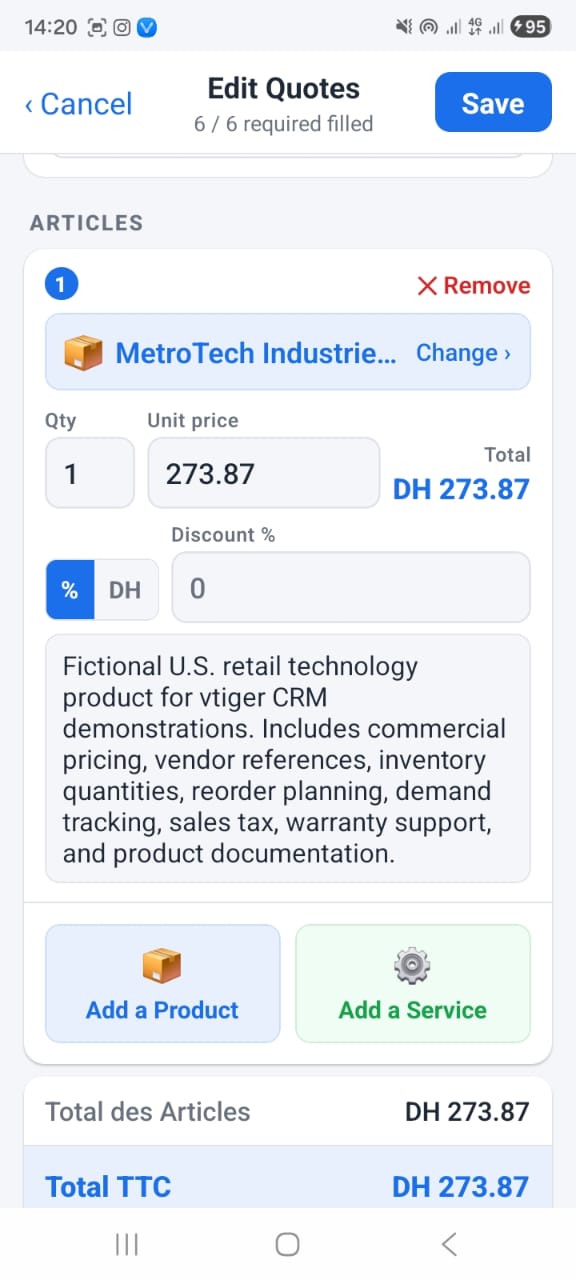
Select the product. A new line item card appears showing the product name, pre-filled Unit price from the vtiger catalogue, and a Qty of 1.
3
Edit Qty and Unit price if needed. The Total (Qty × Unit price) updates instantly.
4
Set a Discount — tap % to apply a percentage discount or DH to enter a fixed amount discount. Enter the value in the field.
5
Repeat for each additional product or service. Tap X Remove on a card to delete a line item.

Totals

At the bottom of the ARTICLES section, OpenCRMApp shows live-calculated totals:

Total des Articles Sum of all line items before tax
Total TTC Grand total including tax & discounts

Changing a product

To swap a product already on a line item, tap Change › next to the product name. The product search opens again and replacing the selection updates the price and description automatically.
💡
Required fields indicator The form header shows "X / 6 required filled" so you always know how many mandatory fields still need a value before you can save the record.
⚠️
Products must exist in vtiger first The product catalogue is pulled directly from your vtiger CRM. If a product does not appear in search, ask your CRM administrator to add it in vtiger before creating the Quote.
OpenCRMApp — Edit Quotes ARTICLES section showing a product line item with Qty, Unit price, Discount toggle and Add a Product / Add a Service buttons

Languages

OpenCRMApp is fully translated into multiple languages. You can set the app language independently of your vtiger CRM language — useful when your team works in different locales.

Changing the display language

1
Open the side drawer menu and tap Settings, or navigate to your profile settings.
2
Tap Language. The language picker screen opens with the subtitle "Choose your preferred display language".
3
Tap any language from the list. A blue checkmark ✓ appears next to the selected language and the app UI switches instantly — no restart required.

System (auto) option

The first option — System (auto) — makes the app follow your phone's system language. If your phone is set to French, the app displays in French automatically. This is the recommended setting for most users.

💡
System (auto) shows your current phone language The subtitle under System (auto) shows which language it resolves to — for example English (UK) — so you know exactly what language will be used before selecting it.

Supported languages

🇦🇪 العربية (Arabic)
🇩🇪 Deutsch
🇬🇧 English (UK) ✓
🇺🇸 English (US)
🇪🇸 Español (España)
🇲🇽 Español (México)
🇫🇷 Français
🇭🇺 Magyar
🇮🇹 Italiano
✅
Your CRM data language is separate The app language only changes the UI labels and menus. The content of your CRM records (field values, notes, descriptions) is stored in vtiger and displayed exactly as entered — it is not translated.
OpenCRMApp — Language settings screen showing System auto option and a list of supported languages with flag icons

Mandatory Fields

OpenCRMApp enforces the same mandatory field rules configured in your vtiger CRM — you cannot save a record until all required fields are filled. The app guides you directly to every missing field so nothing gets missed.

What happens when you try to save with missing fields

1
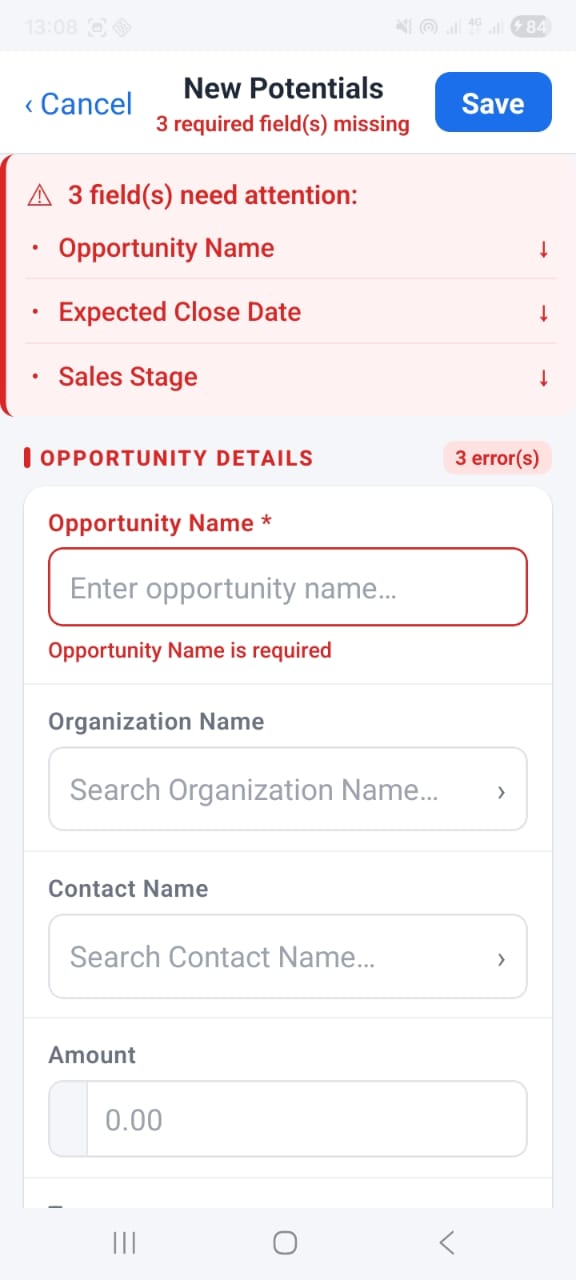
Tap Save. If any required fields are empty, the save is blocked and the form header changes to "X required field(s) missing".
2
A red attention banner appears at the top of the form listing every missing required field by name — for example Opportunity Name, Expected Close Date, Sales Stage.
3
Tap any field name in the banner — the form scrolls directly to that field so you never have to hunt through a long form manually.
4
Each missing field has a red border and a red inline message below it (e.g. "Opportunity Name is required") so it is immediately visible when you scroll to it.
5
Fill in all flagged fields and tap Save again. The record is saved to vtiger once all required fields have a value.

Section error count

Each form section header shows a red error badge (e.g. 3 error(s)) indicating how many required fields within that block are still empty. The badge disappears for a section once all its required fields are filled.
⚠️
Required fields are set in vtiger, not the app Which fields are mandatory is controlled by your vtiger CRM administrator in vtiger's field settings. If a field should not be required — or a required field is missing from the form — contact your CRM admin to adjust the field configuration in vtiger.
💡
Required fields are marked with * Every mandatory field label shows a red asterisk (*) even before you attempt to save — so you can identify and fill required fields before tapping Save.
OpenCRMApp — New Potentials form showing 3 required fields missing banner with Opportunity Name, Expected Close Date and Sales Stage listed as jump-to links

Notification Inbox

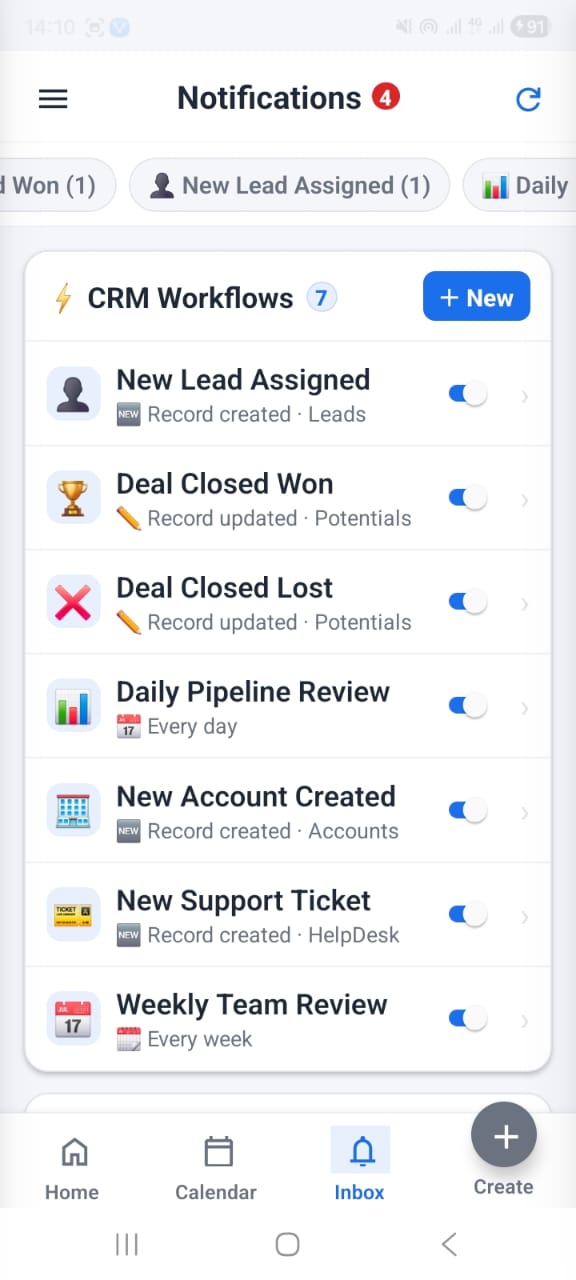
The Notification Inbox is the heart of OpenCRMApp. It collects every alert fired by your CRM workflows and delivers them both as push notifications on your phone and as an in-app inbox you can review at any time.

Opening the inbox

1
Tap the 🔔 Inbox icon in the bottom navigation bar from any screen. A red badge shows the count of unread notifications.
2
The inbox lists all notifications in reverse-chronological order. Each row shows the workflow icon, name, trigger type, and an ON / OFF toggle.
3
Use the filter chips at the top to show only notifications from a specific workflow — for example "New Lead Assigned (1)" or "Deal Won (1)".

CRM Workflows panel

At the top of the inbox, the CRM Workflows card lists every workflow you have created, with a total count badge. Tap + New to create a workflow without leaving the inbox.

Each workflow row shows:

🖼️
Workflow icon & name — e.g. "New Lead Assigned", "Deal Closed Won"
⚡
Trigger subtitle — e.g. "Record created · Leads" or "Every day"
🔵
Enable / disable toggle — pause a workflow without deleting it

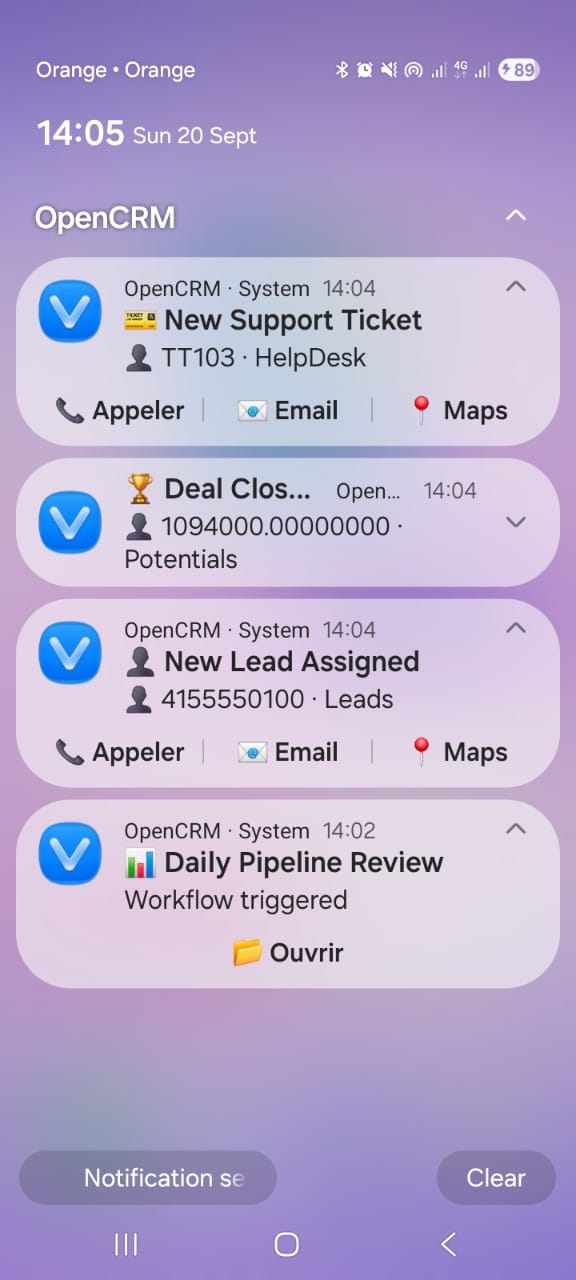
Push notifications on your phone

When a workflow fires, OpenCRMApp delivers a push notification to your phone's notification shade — even when the app is closed.

1
Notifications are grouped under "OpenCRM" in your notification shade and can be expanded or collapsed as a group.
2
Expand an individual notification (tap the ^ arrow) to reveal inline quick-action buttons — Appeler (Call), Email, and Maps — so you can act without opening the app.
3
Tap the notification body to open the linked CRM record directly inside the app.
4
Tap Clear at the bottom of the group to dismiss all OpenCRM notifications at once.

Notification types

🎫
New Support Ticket — fires when a new HelpDesk record is created. Shows ticket ID and module. Actions: Call, Email, Maps.
🏆
Deal Closed Won / Lost — fires when an Opportunity is updated. Shows deal value and module.
👤
New Lead Assigned — fires when a Lead record is created. Shows phone number and module. Actions: Call, Email, Maps.
📊
Daily Pipeline Review — fires on a schedule (every day). Shows "Workflow triggered" and an Open button to go to the relevant record or module.
💡
Tap "Notification settings" to manage push permissions A link at the bottom of the notification group opens your phone's system notification settings for OpenCRMApp — useful if you need to adjust sound, vibration, or priority.
OpenCRMApp — Notification inbox showing 7 CRM workflows with name, trigger subtitle and enable toggle plus a New button

Workflow Setup

A workflow is a rule that watches your vtiger CRM for a specific event and sends you a push notification — optionally with one-tap actions — the moment it happens. Workflows are created entirely inside the app in a 4-step wizard.

Creating a new workflow

1
Open the 🔔 Inbox tab. In the CRM Workflows panel, tap + New.
2
The 4-step wizard opens: WHEN → IF → THEN → NAME. Complete each step and tap Next to advance.

Step 1 — WHEN (Trigger)

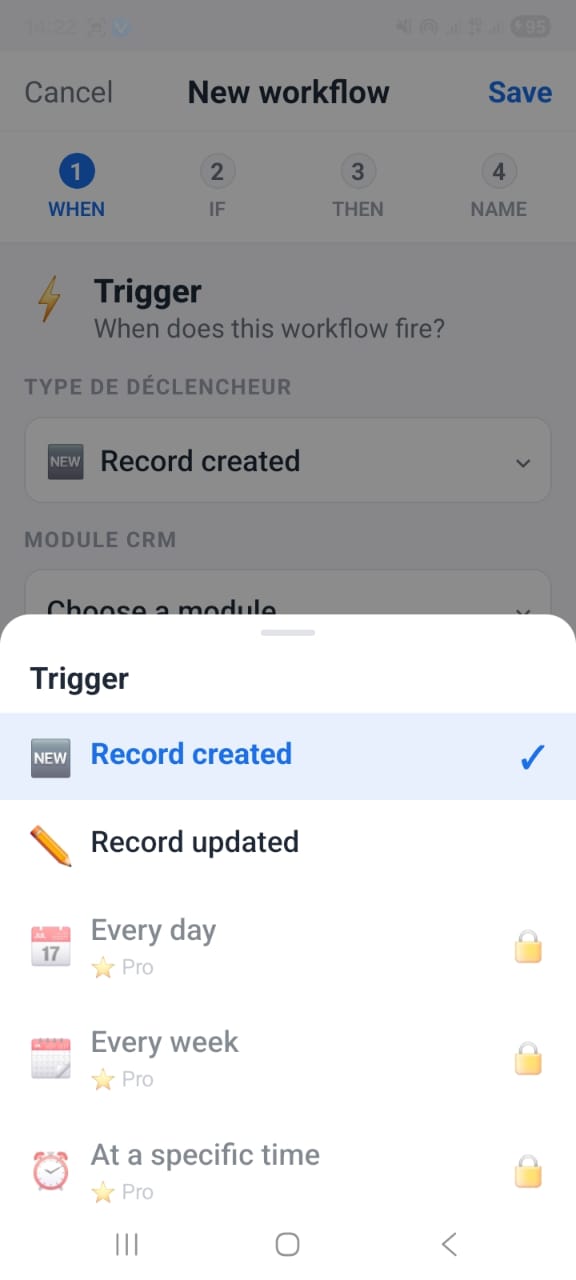
Choose when the workflow fires. Tap the TYPE DE DÉCLENCHEUR dropdown to pick a trigger, then choose the CRM Module it applies to.

🆕
Record created — fires the moment a new record is added to the chosen module
✏️
Record updated — fires whenever a record in the module is modified
📅
Every day Pro — fires on a daily schedule
📅
Every week Pro — fires on a weekly schedule
⏰
At a specific time Pro — fires at a date/time you define

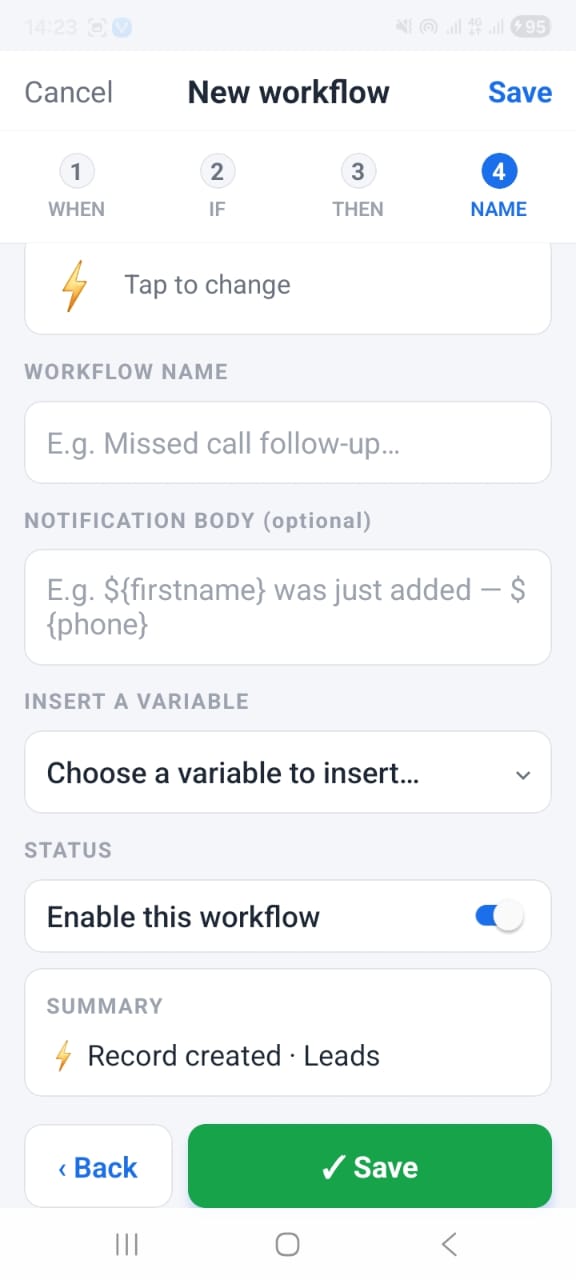
Step 4 — NAME (Finalise)

After setting conditions (IF) and actions (THEN), give the workflow a name and optionally customise the notification body.

Workflow Name — a short label for your own reference, e.g. "Missed call follow-up"
Notification Body (optional) — the push notification message. Use ${"{"} variable {"}"} placeholders to include live CRM field values, e.g. ${"{"}firstname{"}"} was just added — ${"{"}phone{"}"}
Insert a Variable — a dropdown that lists all field variables available for the chosen module so you can pick and insert them without typing
Enable this workflow — toggle ON to activate immediately on save, or leave OFF to save as a draft
Summary — a one-line preview of the full rule, e.g. ⚡ Record created · Leads, so you can verify the setup before saving
✅
Save and test immediately After tapping ✓ Save, the workflow activates at once. Create or update a record in vtiger to verify you receive the push notification.
Step 1 — WHEN
OpenCRMApp — Workflow WHEN step showing trigger picker with Record created selected and Pro triggers locked
Step 4 — NAME
OpenCRMApp — Workflow NAME step showing workflow name field, notification body with variable syntax, enable toggle and summary

Conditions & Triggers

Steps 2 (IF) and 3 (THEN) of the workflow wizard let you add conditions that filter when a notification fires, and actions that appear as tappable buttons directly on the notification.

Step 2 — IF (Conditions)

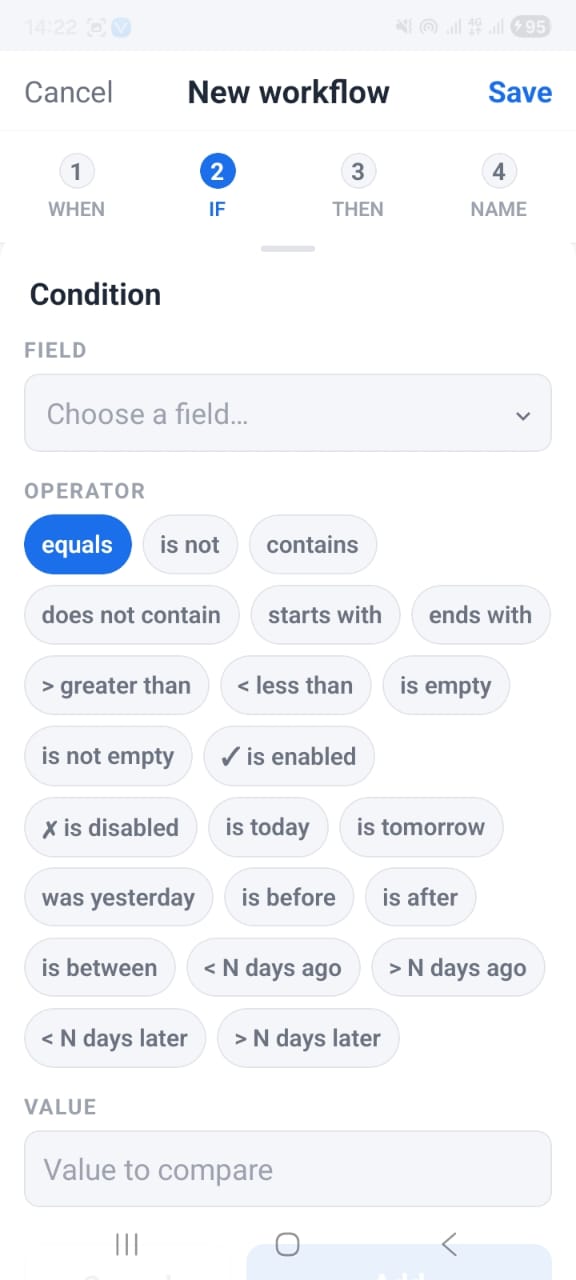
Conditions are optional filters. If you add one, the workflow only fires when the condition is true — e.g. only when a Lead's Rating equals Hot.

1
Tap Choose a field… and select the CRM field you want to evaluate — e.g. Sales Stage, Rating, Assigned To.
2
Select an operator from the pill buttons (see full list below).
3
Enter a value in the "Value to compare" field if required by the operator, then tap Next.

Available operators:

equals is not contains does not contain starts with ends with > greater than < less than is empty is not empty is enabled is disabled is today is tomorrow was yesterday is before is after is between < N days ago > N days ago < N days later > N days later
💡
Skip IF to catch every event If you leave the IF step empty and tap Next, the workflow fires for every record that matches the WHEN trigger — no filtering applied.

Step 3 — THEN (Actions)

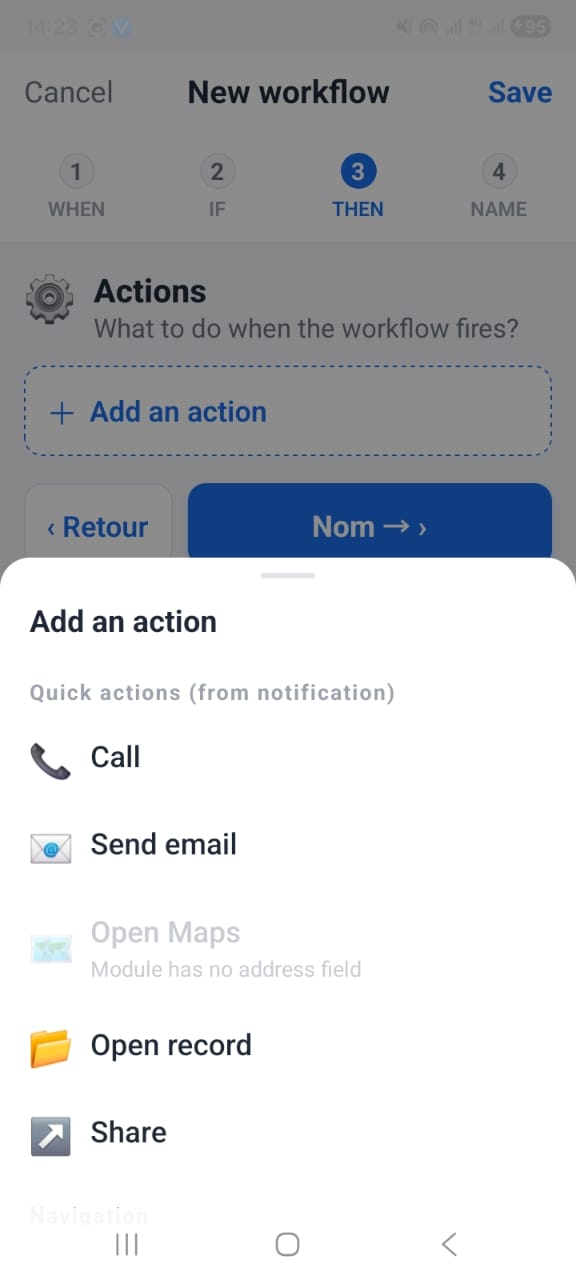
Actions become tappable buttons on the push notification. Tap + Add an action to choose what the notification can do.
Quick actions (from notification)
📞
Call — dials the record's phone number directly from the notification
📧
Send email — opens a pre-addressed email compose window
🗺️
Open Maps — navigates to the record's address (only available when the module has an address field)
📁
Open record — tapping the action opens the linked CRM record inside the app
↗️
Share — opens the system share sheet with record details pre-filled
Navigation
📋
Open module — jumps to a chosen CRM module list when tapped
Create in CRM
✅
Create task — instantly creates a vtiger Task linked to the triggering record
📅
Create event — instantly creates a vtiger Event (calendar entry) linked to the triggering record
⚠️
Open Maps is greyed out when unavailable If the selected CRM module has no address field, Open Maps appears disabled in the picker. Choose a module that has an address (e.g. Contacts, Accounts, Leads) to enable it.
Step 2 — IF
OpenCRMApp — Workflow IF step showing field picker and full operator pill grid
Step 3 — THEN
OpenCRMApp — Workflow THEN step showing Add an action picker with Call, Send email, Open Maps, Open record and Share

Call, WhatsApp & Email

OpenCRMApp puts one-tap communication everywhere — on record detail screens, directly inside push notifications, and as configurable workflow actions — so you can call, message, or email a contact the moment an event fires.

From the record detail screen

Every record that has a phone number or email address shows three quick-action buttons at the top of its detail screen:

📞
Call — opens your phone dialler pre-filled with the CRM phone number. One tap to start the call.
💬
WhatsApp — opens a WhatsApp conversation with the contact's number. Works with personal and Business WhatsApp.
✉️
Email — opens your default mail app with the To field pre-filled with the record's email address.

From a push notification

Expand any OpenCRM notification in your phone's notification shade to reveal inline action buttons — no need to open the app first:

📞
Appeler / Call — dials the record's phone number immediately
📧
Email — opens a compose window addressed to the record's email
📍
Maps — opens the record's address in your navigation app
💡
Notification action buttons are configured per workflow The Call, Email, and Maps buttons only appear on a notification if you added them in the THEN step when creating the workflow. See Conditions & Triggers for how to configure them.

Availability by module

Call & WhatsApp
Contacts, Leads, Accounts, any module with phone field
Email
Contacts, Leads, any module with email field
Maps
Contacts, Accounts, Leads, any module with address field
⚠️
WhatsApp must be installed on the device The WhatsApp button opens the WhatsApp app on your phone. If WhatsApp is not installed, the button will not open anything. The Call and Email buttons use your phone's built-in dialler and mail app — no extra app is needed.
OpenCRMApp — Android notification shade showing grouped OpenCRM notifications with expanded Appeler, Email and Maps action buttons
Coming soon

The following sections are being written. Check back soon or ask a question in the community.
Have a question not covered here?

Ask the community or contact us directly — we usually reply within one business day.

Ask the community View FAQ